Drawing a roofscape in Letraset Tria pens
I have been experimenting with new art materials and very much enjoying the effects which one can achieve by using Letraset pens. I fondly remember the Letraset brand as something which involved lots of rubbing and transfers to make beautiful (if often wonky, given uncareful placement) words and phrases. I also remember trying to make a local plan diagram from rubbing patterned Letraset, it made trees and everything! You can still buy such goodies, but they are perhaps not such a prominent tool in many designer or technicians tools now that computers can do the same thing. One day I will make a “retro” plan illustration with these, just because it’s still possible. The town planner in me has always been creative, the creative in me has always sought out socially aware , useful and enjoyable outlets for my work!
The tria pens come in lovely boxes, there is an “architecture” set which I was kindly given a gift of time ago. I was almost scared to use them because they are so beautiful. Pens are, however, designed to be loved and used… And I have been experimenting with the older pens and some recent acquisitions.

The view from my studio has a particularly nice dome in sight, which as someone who revels in architectural drawing is a challenge begging to be explored. I usually go for black sketching pen and then a watercolour lining, but today the Letraset pens were beckoning.
Materials:
Daler-Rowney smooth cartridge paper (at least 150 gsm)
Letraset Tria- G136, Y516, WG07 and C919
Method:
Start out with an outline drawing of the dome in the lift green colour. This may seem an unconventional choice for line drawing, but as the dome is constructed with copper, which has taken on a patina or age over time, the green reflects this tinge. Concentrate on the symmetrical appearance, but a little artistic licence won’t disturb the overall affect here and there (this is a freehand representation, drawn with love, not a “to scale” model after all).

Add the lines for the dome construction, forming the individual sections of the dome

Continuing to use the fine nib, press lightly to imply structure and form, adding short dashes of line to the dome.
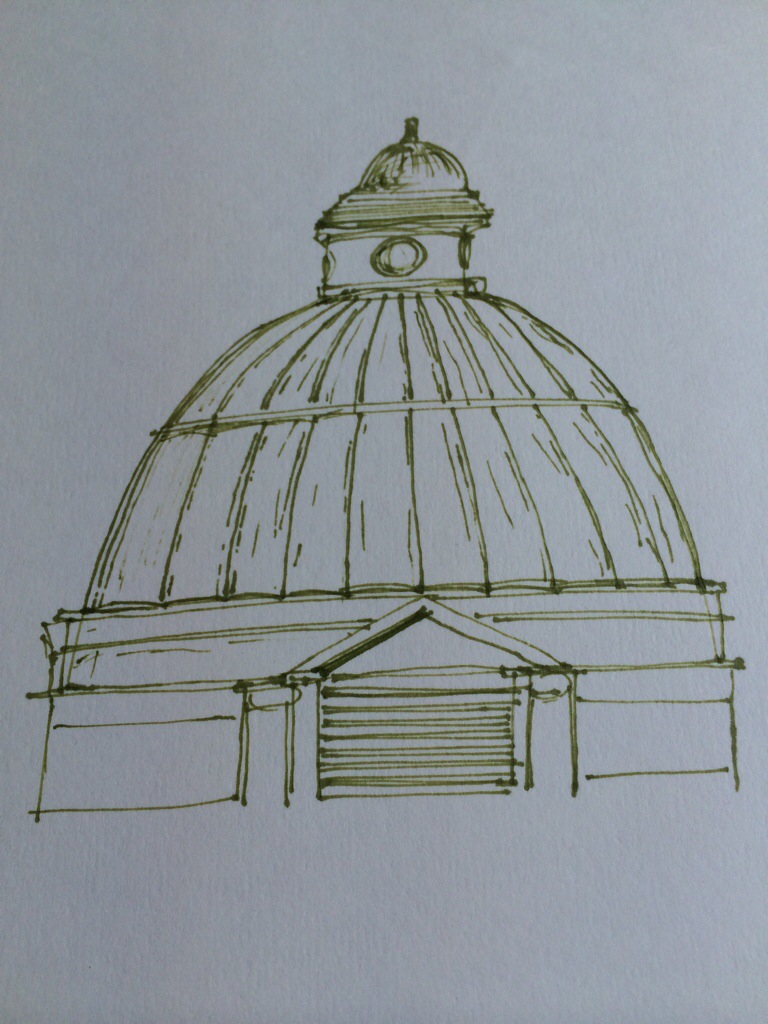
Use the more blue coloured C919 marker to add tones of leadwork to the base of the dome, including the triangular pediment. Lead has different Material properties and is often laid in sheets; reflect this in the lines you use.

Having added more structure to the drawing, it is time to add shadow. Use the brush end of the same pen to add wider swoops of colour, implying shadow.

Continue adding colour, noticing the angle of the shadows. The next stage is to use an alternative colour, Y516, to add a more realistic colour and start to define each part of the structure. The copper is slightly curved on the dome; add lines with the fine tip to imply curved areas. The dome is a greener colour than the lead below, so the new colours reflect this. Occasional areas of brush can be used to add shadow.

Use the last pen (brush tip) to emphasise any areas of shadow and continue tinkering until you are happy.
That’s it!

Part 2 of this entry is ” make it digital”…

Great work. I love pens but haven’t heard of these before